Click for enlarged image.
Showing posts with label Shop. Show all posts
Showing posts with label Shop. Show all posts
Saturday, June 15, 2013
Sunday, June 9, 2013
Further shop set up...
The old green shed is starting to look more like a real woodwork shop. The shelving is installed and going to good use. The tools are unloaded and put in their place. Various machinery settling into place. The bench positioned, wheels removed and vices installed. General tidy up and rubbish removal. (The engine crane and scrap bin in the photo is planned to go to storage.)
The shed's second section will be dedicated to storage. Ultimately I'll place a large wood rack on the wall, and move the scrap bin in here.
Next to the shed I've dedicated an areas 1.2m x 5.6m for a raised vegetable garden bed. Because of the slope of the hill this has meant shifting a lot of soil by hand. This should be installed in the next few weeks.
Wednesday, February 20, 2013
Washing the Walls
After making significant headway in the garden, it's back to the shed. A few weeks ago I ripped out all the old and odd cupboards and make shift shelving that lined the walls. After three trips to the local 'waste management facility' it was time to clean the walls.
First all the tools that couldn't be easily moved out were shuffled into one corner and covered them with a tarp. I then systemically worked from apex to floor giving everything two good hose downs. Years of dust and spiderwebs cleared out and brushed out the door.
My Makita HW112 High Pressure Washer was out of action for a few weeks with a crack in the handle. Replaced under warranty and back to work.
The next step will be clearing out the second section and repeating the process. Then I can work out the layout and start installing machines and shelving in more permeant locations. Hopefully in the next few weeks I'll get the lighting and electricals planned out and receive my new tools from Gregory Machinery.
Saturday, January 19, 2013
The New Shop: Arriving
Here's some photos of the new shop. I'm in the process of clearing out the previous owners mix-match shelving he'd salvaged and put to use. Striping it back to just the timber frame and iron skin. The next step will be clearing out the resident spiders and cobwebs. Then I'll take the pressure cleaner to the walls to de-dust and clean things out. (Unfortunately I did't have time to do this before moving in. So all my gear is piled in the middle and will have to be shuffled as I clean.)
The removalists were great and totally professional. They held a 'can-do' attitude despite a continued low level apprehension about the workbench. But there were no dramas. We had six blokes on scene but it only took three to safely move the bench and thicknesser.
Thursday, January 17, 2013
The New Shop
Today we moved into our new residence and as importantly moved into the new workshop. This will be the fourth incarnation of my workspace and the first dedicated external building.
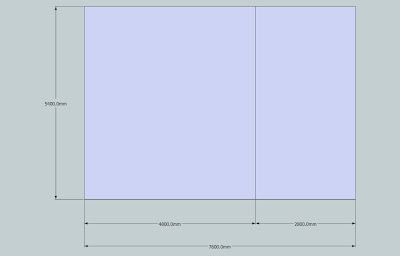
It's quite a big space. 7.6 x 5.4m or ~40m^2. Concrete slab. Hardwood and corrugated iron construction Divided into two sections. The larger will be the woodshop and the smaller for garden equipment and wood storage. There are two large wooden bifold doors on each section and three windows. There is also a car port off to one side. (Currently the building has no electricity.)
All tools & timber came off the truck without damage. (Two wheels on the workbench failed but with one end on a trolley it was moved safely without drama.) I haven't even begun to unpack or plan the set up.
I think this one deserves a name...
Monday, January 14, 2013
Roubo Ready to Roll
I haven't said much about it so far but I'm packing up shop and moving on... The biggest single item to pack up was the Roubo. Here you can see the sliding leg vises are removed. The wooden handles have been unscrewed and the chrome covered in foam secured by quick ties. The external glide wheels are removed and stored away. But for ease I chose to leave the sliding vice on the bench. The top sits on vertical tenons so I added a strap in case anyone tries to lift the top (which weights 150-200kg). You'll also note the temporary wheel mounts.
I've had the bench in operation for nearly 2 years now. (Although I never finished all the details.) Over that time it has been a star performer living up to expectations.
It is starting to show some wear and tear. You can see the impressed marks of the pin mechanisms.
Hmmm... occasionally I use my circular saw on my hand-tool bench... not smart.... I think this section might be cleaned up to hold some vice leather...
The existing leather is looking well loved. I might free it from its hide glue and trim it a little neater.
The move will be a good opportunity to service the bench. It will need re-surfacing and oiling, a middle row of dog holes, a tidy up on the wagon vice block, and general de-dusting / de-rusting.
Despite the Roubo's popularity nowadays... I believe this style of sliding leg vice is still unique.
Tuesday, December 18, 2012
Wheels for the Workbench
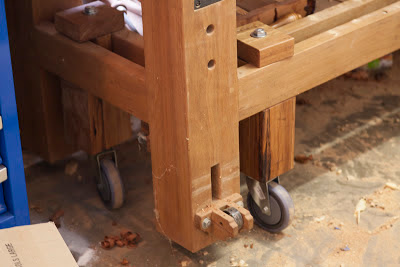
The workbench is now wheel mounted. This is will only be a temporary solution while moving workshops. I used scraps of blackbutt from the original workbench build and formed mounts that lock into the lateral supports. Not and ideal solution but does the job.
Wednesday, September 14, 2011
Thursday, July 21, 2011
The Shop Floods (again...)
Getting your feet wet is not a good strategy for a work bench. Endgrain always looks nicer when not soaked. That's why I store my bench indoors....
Friday, March 4, 2011
Further thoughts on the lumber rack...
The idea of a new lumber storage rack has been revolving and evolving in the back of my mind for a while. To make it capable of holding medium to large slabs the current design is sizable - 0.9m deep, 2.0m tall, and 2.4m in length.
In my original post I was using Radiata Pine based on a design by Daniel Klauder. I'm now considering using Blackbutt Decking (65x19mm) to provide a thinner material and of course match the workbench. For a project this size around 100 linear meters of timber would be needed.
The main structural change to the design is the use of a second vertical post. This allows greater resistant to vertical pressure and spaced at ~165mm allows 150mm (6") ducting to be tunneled for dust extraction. In addition to this it will allow me places to mount electrical and lighting connections.
Any feedback welcome.
 |
| Inspiration for the project on Daniel Klauder's Blog. |
 |
| Another style rack from Julie's Blog. |
Subscribe to:
Posts (Atom)


.png)