Sunday, January 16, 2011

Agnote: Making Beewax Furniture Polish

Ray Sanderson (from the Wool 'n' Wood Blog) has been following the Wax Melter build. He e-mailed this information sheet put out by NSW Argiculture (now DPI) on Making Beewax Furniture Polish.
Link to the Department of Primary Industries (DPI) Fact Page

Wax has a number of uses in my shop; coating iron beds on machines protecting them from rust, and as a final coat after oil on furniture. I normally use U-Beaut Tradition Wax. However, with ample supply of beeswax this recipe seems too fun not to try.

Friday, January 14, 2011

Wax Melter: Nearly there...


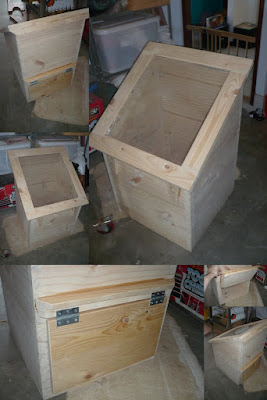
The casework on the Wax Melter is complete. The glass is installed in the top panel (hinges pending.) A back door was cut, laminated and hinged. Two lips (on the glass panel & the the lower door) to keep water from running into the doors. I just need to fine tune the hinges and attach a handle. The next upgrades are metal angle to hold various filters and to build a stand to keep it off the ground.a

Thursday, January 13, 2011

Having a Closer Look and Filling in the Gaps

After a day of tidying in the shop I had a closer look at the legs. The timber had a number of defects which I had to work around. However, for the size timber I required some defects were included. 

The best way to fill defects is with an epoxy filler. Water based putty is certainly easier to use, easier to clean up, and cheaper. However it is not strong and not waterproof. Two part expoxies can be messy to mix but when set provide a substance stronger than timber but easily cut and sanded. Epoxies can also be dyed to colour (I've used shoe polish in the past to fill black defects, sealing the timber with shellac helps  prevent dye penetrating the wood) or mixed with wood dust.

I've used Shelley's brand epoxies in the past with good results. I'm trialling West System Epoxy at the moment. However, it comes quite watery and you need a filler substance to mix with it. West System sell a cotton microfibre/silica powder mix. Just need a supplier...

A close up section of Mrytle Burl. A thin layer of water helps to show  what it will look like oiled.

This piece has some sapwood and burl, but will probably be hidden as the centre leg.

The vertical line is actually borer hole. It is superficial and will fill nicely.

Some sapwood but mostly clear.

This piece is interesting. Probably the most questionable. Lots of filling required to stablise it. 

Clear with some sapwood.

Clear with some small burl patches.

The plan. I'm still debating a stretcher beneath the seat.

Tuesday, January 11, 2011

Shaker Table: Shaping the Bench Legs

With the (near) completion of the Christmas Boxes I've had some time to work on the Anniversary Table. Over the past two days I've worked on shaping the blanks I prepared back in October. The two benches will have three solid legs. Each leg is made of ~40mm Tas. Mrytle. The back is formed by a straight taper and a gentle curve. The front has a gentle curve to match the table leg (seen in the background.) The detail is an ellipse found in traditional design.


The boards behind the first picture will become the seat and the back rest. I am debating on including a stretched under the seat. In Shaker furniture this added strength to the 3/4" timber, but here it'll be purely aesthetic. I feel it shall balance the ellipse and the front curve to have a stretcher ~70mm from the front.

Monday, January 10, 2011

Metal Ducting

To access various machines and far corners of the shop I rely on the mobile base of my dust extractor. With a planned upgrade to a fixed cyclone, to avoid the hassle of moving around the extractor and to allow multiple machines to be attached, I'm planning a major ducting upgrade.

There are several options to run ducting the most common is PVC storm water piping, metal ducting, long lengths of flex hose, and all manner of home made solutions. Being my nature I chose to explore what would be the best option, and that is metal ducting. I contacted a company by the name of EziDuct which seems to offer a great product... but the quote inspires me to simplify the design.


The design is base around a 150mm (6") spine, upgrades my thicknessner manifold from 100mm to 150mm piping, and allows 2 x 150mm outlets, 2 x 100mm outlets and 1 x 50mm. Let me know your thoughts.

Thursday, January 6, 2011

The Glass Ceiling

Today I got cracking on the lid for the wax melter. The lid is made from a solid pine border (formed by laminated 19mm pine) and two sheets of glass 3 x 480 x 520 mm. The glass was sourced from 'A Touch of Glass' and cost $38. 

(You know you haven't had enough shed time
when the spiders have laid claim to your vices.)
The frame is made using hand cut bridle joinery. Although this style of joint is not strong mechanically (like a dovetail) it has great strength to its large surface glue area and maintenance of long grain strength. The joinery was a little rough, but this is an industrial project and not a cabinet for show.


The plow plane made quick work of the twin inner rabbets. These are then lined with foil to aid in reflection  and filled with silicone prior to assembly. After 3 trial dry fits I knew the joints were sound so I was happy to glue and use light clamping to pull it together.


I have to say, I was a little nervous with this glue up. Floating foil liners. Wet silicone in all the rabbets. Two sheets of thin glass.... But everything went smoothly. All about prior preparation. 


The next step cleaning the joint overhang and attaching the hinges. I have some medium size gate T hinges ready for the job. I've attached small pieces of wood to move the frame forward a little to line up the glass and allow for the over hang.

Like at Facebook

Redbubble