


Watch the full episode. See more The Woodwrights Shop.
Showing posts with label technique. Show all posts
Showing posts with label technique. Show all posts
Monday, June 13, 2011
Edge to Edge Mitres with Roy Underhill
I started thread over at Woodtalk Online about how best to strengthen the long edge to edge mitre joints that form the lectern's column. Bob Rozaieski (of Logan Cabinet Shoppe fame) pointed me to this helpful (and free) video by Roy Underhill (of The Woodwright's Shop fame). Thanks Bob.
Labels:
Church Furniture,
technique

Saturday, May 14, 2011
Experimental Filling...
The first thirty minutes of shop time I've had in 6 weeks was spent reviewing the pews. It gave me an opportunity to see the results of various filling experiments I tried on the project. (Of course it's recommended do technique 'experiments' on scraps prior to the actual project, but this time it's on the project.)


The first 'filling' job was the plugs to cover the screws. Made with the Veritas Snug Plug cutters from Indian Ebony these proved to be highly successful. (But ebony is not cheap). The plugs simply tap into to place and hold with glue. To finish simply flush trim and sand.


The first Epoxy experiment was done using the west system microfiber system. The microfiber in fine powder forms acts to thicken the glue and allow better filling properties. However, this also tinges the filler white... not such a good look.


Next up with have microfiber with fine saw dust. Allow I've had success with this technique in the past this time it made the filler appear heterogenous (ie. tinged white with flecks of reddy brown). Better but not there yet.


My final option was black oxide. This carbon like powder is designed to colour concrete and is dirt cheap. Used with or without microfiber it made a solid homogeous filling agent. Perfect... well if your wanted black any way.
Defects that were exposed to the element while the tree was standing often have a black edge. I presume this is related to oxidation within the wood. Filling these gaps with black filler is effective.
For other colours, such as to match the reddy brown, I would try even finer saw dust (such as that out of the sander) or turn to dyes and stains to turn that white tinge what ever tinge you want.
Epoxy has a significant advantage over water based fillers such as 'putty' - strength. Epoxy can seep into the defect, completely fill it, then set harder than wood, holding the defect together. This strength is essential to fill large defects and stablise burls.
Labels:
technique
Sunday, February 6, 2011
Epoxy: O what a versatile glue...
What is Epoxy?
The all knowing all seeing Wikipedia explains 'Epoxy is a copolymer; that is, it is formed from two different chemicals. These are referred to as the "resin" and the "hardener".
The resin consists of monomers or short chain polymers with an epoxide group at either end. Most common epoxy resins are produced from a reaction between epichlorohydrin and bisphenol-A, though the latter may be replaced by similar chemicals. The hardener consists of polyamine monomers, for example Triethylenetetramine (TETA).
When these compounds are mixed together, the amine groups react with the epoxide groups to form a covalent bond. Each NH group can react with an epoxide group, so that the resulting polymer is heavily crosslinked, and is thus rigid and strong'.
Which Epoxy do I use?
In woodworking Epoxy is the choice of glue when gap filling is required. The most common wood glues are PVA like glues that require zero-clearance. These glues are not self supporting and any gap will lead to a tremendous reduction in bond strength. Epoxy left alone become a plastic like rigid structure can bridge gaps. Woodworking applications include to bond poorly fitting joints, filling defects in wood (checks, bore holes, splits), and useful on endgrain as it doesn't absorb along the fibres as other glues.
At present, West System Epoxy is my epoxy of choice. It is available from woodstores like Carbatec and boating and fiberglass stores. The cheapest supplier I've found is Fibreglass Material Services in Broadmeadow. West System Epoxy is a very low viscosity product (very thin and watery). They sell a variety of filler products like silica/microfibre powders that can be added allowing you to increase the viscosity to whatever the application demands.
Application 1: Fixing the Dust Extractor
A recent Dust Extractor mishap left the impeller housing split. After some encouragement (with a hammer) the housing went back together. To seal the joint and fill any gap I used epoxy mixed with iron oxide to thicken the glue. This will be then be sanded smooth and the paint job refreshed.


Application 2: Filling Wood Defects
Wood is not a homogeneous man-made product, but an organic (ex-)living tissue. Defects form by grow patterns (such as burls and branch points), insect attack (borer holes), and issues with drying (checking). For a consistent and stable finish these defects need to be filled. Here I am using West System epoxy with the silica/microfiber filler to fill gaps and stablise a burl. The excess can be scraped back and then sanded level with the wood.
This filler produces a clear/slightly white finish. Often it is more aesthetic to actually use a black filler. In the past I have used shoe polish and ebony sand dust. Iron oxide used to colour concrete is a cheaper and easier alternative. With shoe polish I noticed that the colour bled into the wood. To counter this you can use a shellac sealer to seal the wood prior to applying the epoxy.


Epoxy, O what a versatile glue...
Labels:
Dust Extraction,
Suppliers,
technique
Sunday, January 16, 2011
Agnote: Making Beewax Furniture Polish
Ray Sanderson (from the Wool 'n' Wood Blog) has been following the Wax Melter build. He e-mailed this information sheet put out by NSW Argiculture (now DPI) on Making Beewax Furniture Polish.
 |
| Link to the Department of Primary Industries (DPI) Fact Page |
Wax has a number of uses in my shop; coating iron beds on machines protecting them from rust, and as a final coat after oil on furniture. I normally use U-Beaut Tradition Wax. However, with ample supply of beeswax this recipe seems too fun not to try.
Labels:
technique,
Wax Melter
Wednesday, December 8, 2010
Base Molding: Part 1
The base molding for the Christmas Shaker Toy Chest is a simple hand planed round over. The process is rather simple...


I then secured the piece tightly on the bench.


For the final passes I switch to a block plane set for finer shavings. And finally some cloth backed sand paper makes everything smooth.


The next steps will be to join the pieces (more dovetails), attach it to the boxes (more glue and clamps), and cut the curved legs.


One day I'll acquire some molding planes (such as those from HNT Gordon) and form more complex designs. But for the time being a simple round over works a treat.


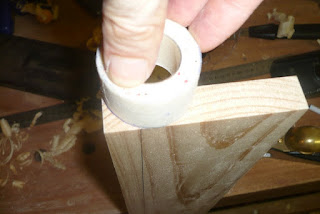
First mark how far down the face the curve will go. In this case I measured the thickness of the timber with a combination square and followed it with a mechanical pencil.

On both ends mark your curve. I used a pen (because it needs to be clear, and will be on the scrap side) and a roll of micropore tape (because it was handy and roughly the size I wanted.)

I then secured the piece tightly on the bench.

Planing a curve with a straight plane is a simple matter of making a polygon and gradually increasing the number of sides. With a sharp no 5 jack plane I then hand plane at ~45 degree to the curve of my circle. This forms two peaks (at 22.5 and 67.5 degrees). I then plane those to the curve. I continue this process until it close to the curve.

For the final passes I switch to a block plane set for finer shavings. And finally some cloth backed sand paper makes everything smooth.


The next steps will be to join the pieces (more dovetails), attach it to the boxes (more glue and clamps), and cut the curved legs.
One day I'll acquire some molding planes (such as those from HNT Gordon) and form more complex designs. But for the time being a simple round over works a treat.

Labels:
Shaker Blanket Box,
technique
Sunday, November 21, 2010
Stefang's Dovetail Tip

After my last post on dovetails, I was pointed to a tip for closing small gaps by a fellow Lumber Jocker. I hadn't seen this before and thought it was worth sharing. I'll let Stefang explain it in his own words - link to his LJ Blog.
Labels:
technique
Friday, November 19, 2010
Dovetailing
Dovetailing the 860mm sides of the Wax Melter is no mean feat. Fortunately since my first attempt at dovetails in 2007 I have a few new toys and am no longer using tool boxes to support the sides of the piece.

The twin leg vice combination truly excels at this task. It securely holds edge side the entire length of the vice. (I did notice some flex in the middle of the pine board which required stablisation with my left hand.)


A 2cm tail is marked every 5cm. I used the Vertias 1:6 dovetail marker, a mechanical pencil, vertias wheel gauge, and a 1m rule to achieve this. You'll note that both sides are in the vice allowing me to cut tails on both boards at once speeding production.


This is the first time I've been able to test my new Wenzloff & Sons Dovetail saw. A nice tool to handle and quick to use.

Both sides complete.

Using eclipse blades in a stanley coping saw I removed the bulk of the waste.


I then cleared up to the waste with a chisel. I used the cut tails and a vesper marking knife to layout the pins on the corresponding board. The pins were cut using the same above technique.

One side complete. Three to go.


I do have to show some errors though. (Fortunately this project is to be painted so the final product will not be effected.)
Left: You can see the rabbet for the base board. Ideally this would be a stopped rabbet or mitred so it cannot be scene. I'm intested in about others would get around this project.
Right: In some of my earlier chiseling my chisel wasn't sharp enough and I had some resulting blow out and damage to the surface some of which will need some putty filler.
Labels:
Christmas Boxes,
technique,
Wax Melter
Wednesday, November 17, 2010
Christmas Boxes: Flattening the Sides
Flattening the Sides
The timber in this project was purchased as 'dressed-all-round' (or DAR). This is meant to mean that each edge side is flat, parallel to the opposing side and square to the edge. For several reasons this is never the case. The timber is processed probably years ago in a production line in a climate different to my own. The changes to moisture content as it dries further allows wood to do it's think and warp, cup and twist. Crosscutting the timber into smaller pieces changes the internal tensions within the board allowing new movement. And the mass produced aspect means that care is not taken with individual boards.


To begin with I tranverse (planing 90 degrees to the average grain direction) with my Stanley No 7. The blade (which is original) I have sharpened with a chamber (curve) to scoop the grain. Tranversing results in small areas of tear out.

The next step would be using a jointer or a smoother plane to make passes at 45 degrees and then parallel to the grain. The process needs constant checking with straight edges and winding sticks to make sure you're still flat. But I don't have a good smoother... so it's back to the power tools.

Using a belt sander (Makita 9924DB) I first traverse and then move parallel to remove the plane marks.

Using a random orbit sander (Makita BO5021KX1) I then remove the belt sander marks.

In the end I have four boards 540mm x 860mm ready for joining.
This technique is not perfect, but it works. Hand planing to finish would be faster, more enjoyable, less dusty, and result in a better finish. (Though care must be taken for tear out.) However, you need a finely tuned smoother which I just don't have. Did I mention there is a wish list on this site....
Sneak Peak: The Next Step - Dovetailing the Sides
The sliding leg vice comes into it's own...
Labels:
Christmas Boxes,
technique,
Wax Melter
Saturday, October 9, 2010

Saturday, September 11, 2010
Hand Cut Tenons
As always in woodworking the first step is marking out. To form the tenon I needed to remove 6mm of material on each face, and 15mm at each edge. For this task I use a vesper marking knife, a veritas wheel guage, and a square. (See layout tips.)

The first cut is done with my 14" LN rip tenon saw to cut down each face.

Under the dust you can see I'm using a Bench Crafted vice in the sliding position to secure the piece. A simple tip from Derek Cohen (In the Woodshop) was to have the board at an angle away from me, changes the rake vs fiber angle, and greatly eased the sawing action.

Contrary to how this photos appears I do actually saw with my eyes open.

The next step, using the rip saw again, is to cut down each edge.
To remove the waste material at the shoulder, I secured the piece with a bench dog and hold fast, and used a cross cut saw to cut down the shoulder.

And there we go. One tenon ready for a little tidying with a rabbet plane for a nice snug fit into the mortise.
Labels:
Myrtle Anniversary Shaker Table,
technique
Subscribe to:
Posts (Atom)
.png)