Showing posts with label Myrtle Anniversary Shaker Table. Show all posts

Saturday, June 18, 2011

Myrtle Anniversary Shaker Table, finished!

As a gift for my wife for our fifth wedding anniversary I’ve been slowly working on a Shaker inspired dining table. Although it needs a final wax the table has already found its way into our home. (7 months after our anniversary…)


The table is made from Tasmanian Myrtle (supplied by Boutique Timbers) with Indian Ebony accents. The top is 1m x 2m. The central boards are of 20mm fiddleback the edging 40mm of the more straight grain. The top is stabilised with a two large breadboards and two braces beneath.


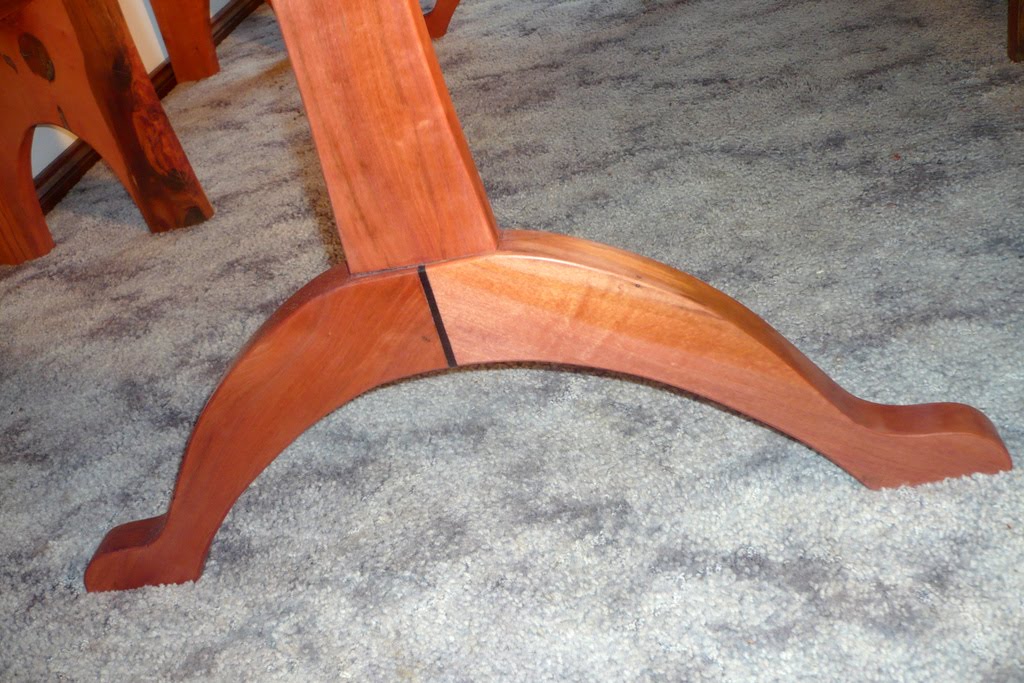
The feet are angled 40mm Myrtle joined together by a handcut sliding dovetail, and to the central post by a twin wedged tenon. The leg stretcher holds to the legs by a ebony keyed through tenon, allowing the legs to be removed and laid flat for transport.


The benches can cater for eight diners in comfort or ten on a squeeze. The 40mm timber is joined by halflap joint, screws and glue. Solid. The curved table legs allows foot room for people sitting on the ends and the central stretcher keeps well away from anyones knees. The is a single 10cm back support for the lumbar region. The sit depth is limited to 300mm (due to my planner width) which I wish her 400mm for more thigh support.


Click for details: Myrtle Anniversary Shaker Table

For more photos and detailed documentation of the work in progress check out old posts – the love of wood - Shaker Table #2: Tasmanian Mrytle.

Monday, June 13, 2011

Flat Pack Furniture

I don't have a lot of 'flat pack furniture.' Most of the time I stay clear of Ikea. But there's not reason that custom solid timber furniture can't be solid when assembled and conveniently flat when transported. 


Tuesday, June 7, 2011

The top attaches to the bottom...


Transporting a 2x1x1m table is an epic task. Not only is the weight a hassle, moving it through downs and around corners becomes near impossible. To make this easier the table is design to break down into pieces. First the legs are held together with the keyed tennons (easily tapped into place) and then screwed/bolted up into the tabletop.


The first step in the process is the supports beneath the table. Four 20mm supports stretch under the table and support the thinner (20mm) fiddleback mid section to the thicker 40mm edge pieces. Slotted holes allow for horizontal wood movement while simple brass screw stay in position. Because these sections won't normally need to be removed a screw works well.

Connecting the legs to the support is a different story. These need to be able to tightened and taken apart multiple times over the lifetime of the project. Threading the wood or inset nuts are ok, but I find they wear and fail. 


For this project I'm using 3/16" brass nuts and bolts. I used the leg to mark where to drill. Then counterbored with a forsner bit. With the support removed from the table I could tighten the bolt while holding the nut. Then I filled the counterbore with... epoxy. Leave to set. (Not forgetting to remove the bolt.) A quick sand and oil. And we're done.


Sunday, June 5, 2011

Refining the Center Stretcher

Construction of the Anniversary Shaker Table is in the home stretch. Today with the stretcher held securely to the bench I could finish some of the details. A nicholson fine rasp, a cheap riffler and some sand paper made quick work of rounding the edges and fitting the joint.


Holding the stretcher to the legs are keyed through mortise and tennon joints. I made the ebony keys quickly with a chisel and saw. Although a quick and fun way to build... the lack of planing caused one small hassle. A combination of a slight difference in the angle of the key and mortise and leaving the short grain too short caused a small blow out at both ends. The solution... it's now a design feature...

Wednesday, June 1, 2011

Oiling the Benches

Progress may be slow, but progress is progress. One bench is finished and in the house. The other is finished and airing in the shed. Yesterday I put the last coat of oil on it. Using 0000 steel wool I rubbed in a third coat of Organoil wiping the excess with paper towel. After a month or so I'll come back an add a very thin layer of wax. Now onto the legs for the table...


Friday, April 1, 2011

Phew those pews were long overdue...

Work, sickness, and family priorities have led to very little in the way of woodworking these past four or five weeks. Today however I had a break through in assembling the pews. 


The 5" makita ROS sander got a mighty work out. Prior to assembly all pieces went step by step through 120, 180, 240, shellac sealer, 240, and 320grit. It reads quickly, but it took several hours to get through all the pieces.


Repetitive drilling was made easier with a memory stick made from scrap pine. A drill press allowed me to form 90 degree holes at set points in the scrap. The scrap could then be moved along the board and used to guide a hand drill. A quick pilot hole with a twist bit followed by a counterbore with a forsnter bit.


After gluing and screwing the holes were filled with plugs. The plugs were cut using the vertias snug plug system (very nice), glued, tapped, and then flush cut.


There's still work to go; more sanding, and then the oiling begins.

Monday, March 7, 2011

Up close with a pew: Joinery

Just a quick blog post to show some of the simple joinery that goes into making a pew.


With the seat removed you can see a stretcher that runs below. This stretcher joins the legs with three half-lap joints. The stretcher prevents racking (the legs rotating on the seat) and strengthens the seat.


The edging is combination of decorative curves and natural edges.


Around 1 cm of material is removed from the leg piece for the back rest to sit in. This is deliberative left short to allow the back rest to run the height of the round over above the leg.


The last few days have been spend filling in checks and cracks with epoxy. After final shaping and sanding the pieces will be connected with glue (titebond III), screws, and ebony plugs.

Thursday, March 3, 2011

Would you like a pew with dinner..

Serious progress is being made on the bench seats... which strangely look like pews... The main joinery is complete. Plenty of work to go however, final shaping (mainly on the back rest), sanding, gluing (with screws and ebony plugs), and then finishing... 


Chairs/benches are always a little tricky to get the right feel. (Especially for someone with limited experience). The benches a tad low but this will be corrected with the a cushion/upholstery over the wood. The backrest is posture correcting at the height I wanted to support the lowerback. Once the round over is completed this should be even more comfortable. I'm surprised at how narrow the seat is (forwards to backwards direction) meaning that my thighs are only supported between 1/2 and 2/3 the distance. The size was limited by my planner capacity but next time I would bring it forward or make it wider.

Wednesday, March 2, 2011

Roughing out the stretcher details...

The stretcher or cross member is essential to hold the two trestle legs securely. Using a jigsaw and belt sander I thinned the center producing a gentle curve. Looking at it now it could be thinned further at each end. 


The through tenons are secured using a solid ebony 'key'. At present they are functional but also need some detailing work with the rasp. 


Overall... average.

Sunday, February 27, 2011

Oh, so that's what it will look like....

The Anniversary table has been a long time in the coming. To check proportions and decide on final sizing and shaping I assembled the piece in our small courtyard. The shaker inspired modern table is a 2x1m trestle table with two benches capable of sitting eight comfortably. 


The benches will be assembled with long screws covered by ebony plugs - keeping the detail of the top.


In the shaker design which uses 3/4" timber (cf. 1 1/2" timber in my piece) there is a stretcher beneath the benches to prevent racking and increase strength. Although this is not needed with the thicker timber I plan to add a smaller stretcher for aesthetics. 


The top I've had completed and finished for nearly 6 months. Given the heat we've had lately the top has shrunk about 1.5cm across it's 1m width. The breadboards were designed for 2cm of movement so this isn't a problem (other than needing to tidy the breadboards).


Since this last photo was taken I've shaped the stretcher supporting the two legs. In keeping with the rest of the piece. It now has a gentle curve thinning the mid section. The ends will be tightened with keyed m&t joints which need to be shaped and sanded.

Like at Facebook

Redbubble