Showing posts with label tools. Show all posts

Tuesday, February 3, 2015

Planer Tune Up

The planer / thicknesser combo was an easier tune up. I purchased some new blades from carbatec (took over 2 months to arrive, despite me checking that they were in stock before ordering). The old blades I have had sharpened locally. Always a little tricky to level the three blades which are suspended by 12 springs and 15 bolts. 


Bandsaw Tune Up

The current HiFi project requires some 50mm timber resawed and machined to 18mm. Assuming the bandsaw was still in top condition after more than a year since serious use... was a mistake. The first resaw job looked like I was making shingles with a beautiful cut at the top and a wedge at the bottom. The culprits were a combination low blade tension and the lower blade guide having come loose. It was a good excuse to take it all about and give a clean. Immediate rewards from a little maintenance with the remainder of the cuts working well. 


A couple of useful links:
http://www.finewoodworking.com/tool-guide/video/how-to-set-up-a-bandsaw.aspx
http://www.finewoodworking.com/how-to/video/how-to-resaw-on-the-bandsaw-video.aspx

Thursday, February 17, 2011

Carbatec CT-2042 Back in Action

The main dust extractor for my shop is a 2HP Carbatec CT-2042. Over a month ago it sucked up a large piece of wood splitting the case and bending two impeller blades. Various fixes were proposed and discussed. This week I've been able to test it out, and so far so good.


In the end the fix is rather primitive. After opening the weld and re-closing the case I had several options to reseal it. Without access to welding equipment I attempted solder and blind rivets. I didn't have too much success. 

With the epoxy out for other projects I thought why not. (After all the auto industry uses epoxy based gels as fuel tank patches.) With the glue set a new paint job was applied to neaten things up. 

The impeller was even more crude, using a hammer, an eyeball, and a persuasive swinging motion, it moved back into place. I don't have a photo but I was able to get a reasonable angle (just slightly straigher than the others)

Carbatec are still looking for a replacement part.

Tuesday, February 15, 2011

Tool Review: 2 Terrys - Blow Fly Sander Part 2


I acquired the Blow Fly with a particular job in mind. That is to sand the curve on off the ellipse cut on the bench legs. There were rough marks left during the cutting phase. In the past I have used a spindle sander to remove these with good results. 


This is one task however, the Blow Fly did not excel at. The cloth backed abrasive sand paper folded around the wood. This preferentially sanded the edges and not the center, resulting in a curved edge. In the above left photo how the marks are removed only on the edges. I cut the sand paper as advised on Stu's Shed to stop the paper folding in the center. This improved things but as you can see in the right photo the consistent round over is altered. 


As it is so often a trusty hand tool saved the day. A vice, a rasp, and some elbow grease got things back on track. With most of the marks removed I could then used the Blow Fly not as a shaper but as a sander.

(In retrospect I would have made my initial cuts neater. Two options to improve the cutting radius of the jigsaw would be to use a shorter blade for tighter curves or remove the top section of wood with a large diameter forstner drill bit.) 


What the Blow Fly sander excelled at was sanding the natural edge portions of the project. This reason alone would justify it's purchase when using natural edged wood. It had just the right amount of flexible to round over the edges in a fast and efficient manner. Some hand sanding is still required but I much prefer this to more aggressive options like a grinder. The Blow Fly mounted in a hand drill would quickly allow the edge of a natural slab table to be smoothed.

In conclusion, the Blow Fly is a well made and innovative tool. Although it didn't fulfill the purpose I had for it, what it does to do it does very well and is a welcomed asset in the wood shop.

Monday, February 14, 2011

Tool Review: 2 Terrys - Blow Fly Sander Part 1

Terry Walker and Terry Gosschalk are the men behind the Australian tool company TT Designs or the 2 Terrys (http://www.the2terrys.com). They produce a small array of simple yet innovative devices for the shed and garden.

They call one product the Blow Fly. Essentially it is a drill mounted flap sander.  It is similar to a spindle sander in that it allows sanding of relatively tight curves. As the abrasive material is flexible it allows the sander to contour to the size and shape of the object being sanded. (This proved to be a blessing and a curse, but you'll have to wait for part 2.)


The Blow Fly was promptly delivered within 2-3 days of order. It was well packaged and included sand paper of various grit, scourger pads for cleaning/polishing, and leather pads for honing/polishing.


The Australian designed and made tool was of high build quality. Practical and solid.


The outer steel rods are sprung to maintain tension. To load the paper or pads you simply unhook from rods and slide on your abrasive. The process was fiddly but straight forward.


With the Blow Fly mounted in the drill press it was ready for action. Unfortunately I don't have any photos of this stage so that'll have to wait for a part 2. Results were a little mixed so stay tuned.

Friday, February 11, 2011

Tool Review: Vesper 7" Square

Accurate layout is an essential basic component of woodworking. Marking accurately 90 degrees is essential in marking out any type of joinery and dressing timber (making it square on all four surfaces). A few weeks ago I received a long awaited hand made try square from Chris Vesper.


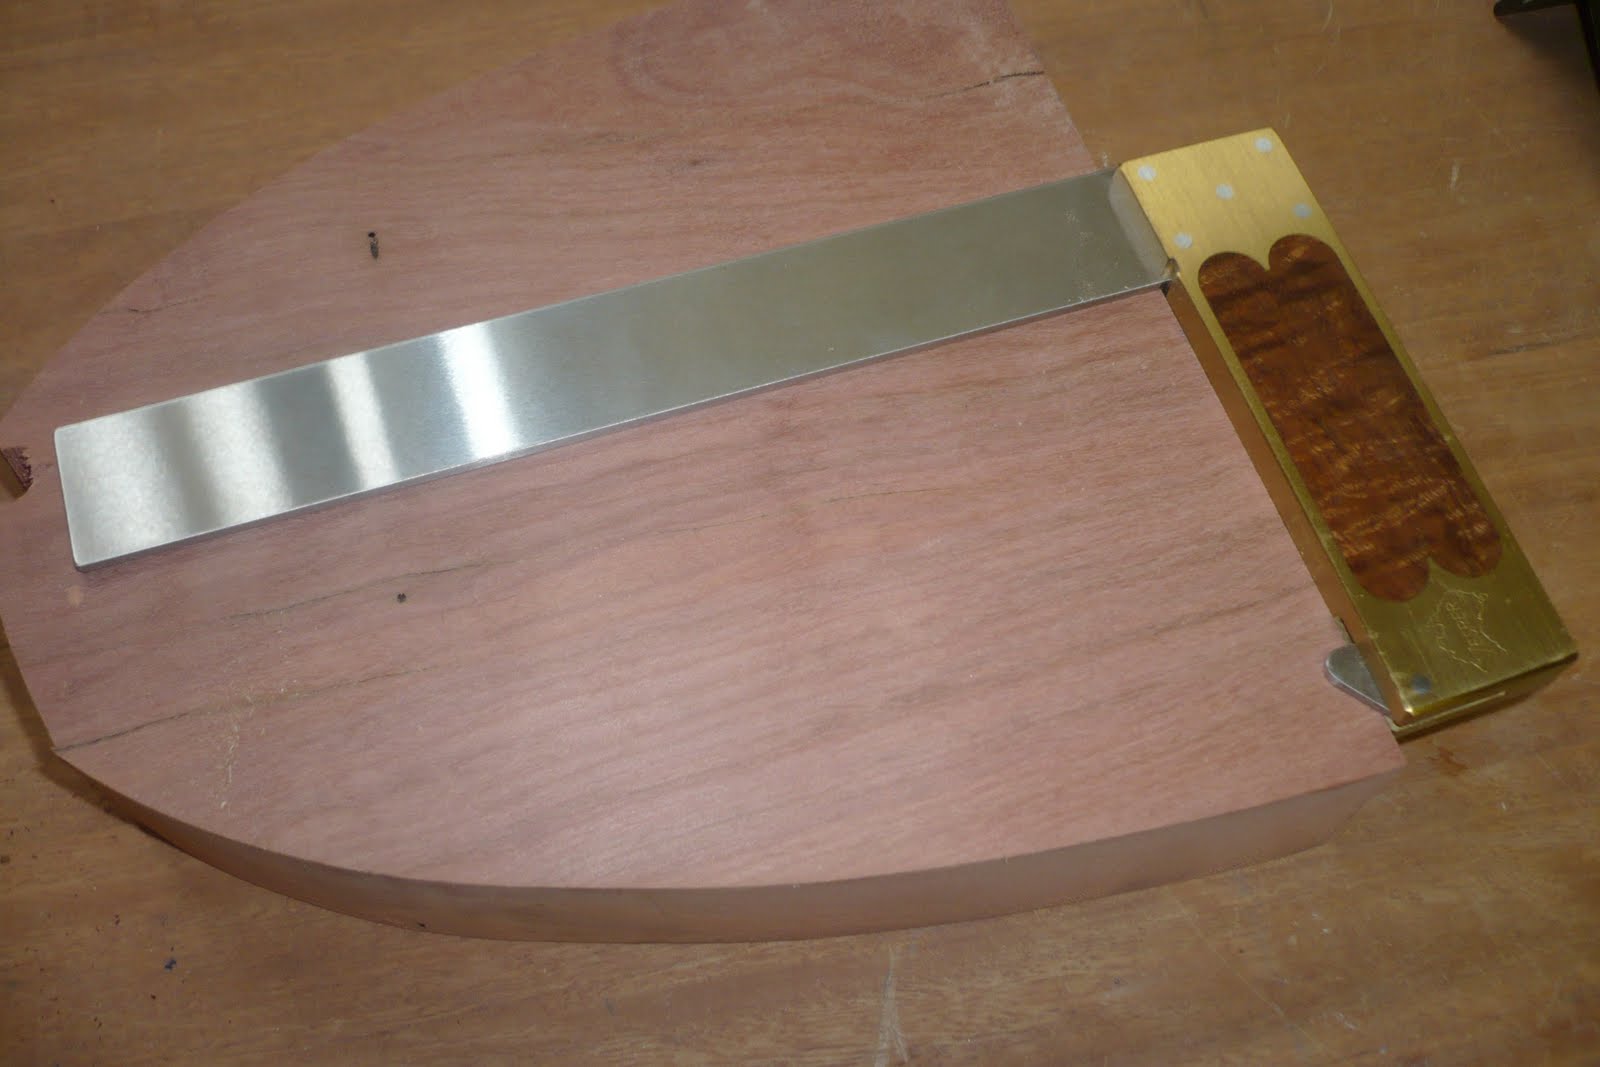
Chris uses brass, stainless steel, and speciality timbers to produce try squares and sliding bevels. Avaliblity flucuates as they are made in limited production runs throughout the year. His try squares are avalible in 4", 7" and 10" lengths. The square I purchased is 7" (which is most versatile in my shop) with a fiddleback Tasmanian Blackwood inlay.


When you first handle a Vesper Try Square you'll be impressed by its mass and solidness (if that's a word). The blade made of stainless steel is without flex or distorsion and impressed me more than I expected. The brass handle is appropriately sized and comfortable to hold.

A unique feature of the Vesper Try Square is a toggle tab at the base of the handle. Whereas, normally the handle for sag under gravity moving the square, the tab supports the handle at the same level of the blade. When not needed it simply clicks away. After a few weeks in the shop this has proved to be a very handy feature.

How square is a Vesper Try Square? Well mine is not perfect when compared to Chris' master square. Over it's 7" length it deviated 0.065mm. Which would account for any gaps in my joinery. :)

What the downsides? The cost is understandable (given materials, time to build, and craftsmanship) but nearly prohibitive. Fortunately this was a Christmas Gift from my wife. The other issue is delivery time. The one I have is from the original production run which was 18 months in the making. Chris informs me that delivery time is now 2 months and set to improve throughout the year.

Colon Clenton's re-calibratable squares are the main competitor in the market for Australian fine hand tools. They have the advantage of being able to re-calibrate (orrect slight angle faults), have been around for longer and are slightly cheaper. When discussing the pro's and con's with Chris he argued 'Why do you need to change it? If it's made accurate and built to stay that way.' (Paraphrased from a conversation at the 2009 Sydney wood show.) Chis put forward that using a solid brass handle with a wooden inlay is dimensionally more stable than a solid wood handle with brass on on each side. That being said, everyone I know that has used a Colon Clenton tool would attest to the quality and accuracy of his tools.


The Vesper Try Square is the forth square in my shop. The square on the left is a Stanley combination square. It has its uses but is grossely not square. The centre square is the Veritas Saddle Square. The square on the right cost me $3.26 from Super Cheap Auto. Compared with the Vesper Square it shows surprising accuracy but suffers due to how light weight and flexible the blade is.


The Vesper Try Square is a welcomed addition to my wood shop. It is a beautiful tool which is solid, accurate and Australian. Next on my Vesper Tool wish list is the 7" sliding bevel and the 4" sliding double square for joinery.

Monday, February 7, 2011

Tool Review: Veritas Dovetail Markers & Saddle Square

Under the Veritas Brand, Lee Valley sell five gauges in this style. Two square (small and large), two dovetails markers  (1:8 and 1:6 ratio) and a 45 degree mitre gauge (which I will be picking up with my next LV order.)

A 'saddle square' is a simple laying out tool that is square (90 degrees) in two planes. This allows you to mark square across the face of a board, and without moving the square accurately mark down the edge of the board. This tool is super useful in hand tool work as it allows you mark the shoulders of cuts with precision. A very handy tool. A 'dovetail marker' is slightly different having a square side and a side at an angle for laying out dovetails.


They are made from anodised aluminium making them tough and light weight.  A small notch in the inner angle is a nice attention to detail which helps to keep the surfaces flat and allow starting point for the marking knife. (They do however scratch easily with a marking knife if you get too close.)

Would I recommend them? Yep, I do. I use them on nearly every project. Of course you could make your own, or use a traditional square/sliding bevel. However, these gauges are relatively inexpensive, always set at the right angle, and are super easy to use.

Monday, November 15, 2010

Tool Review: Veritas Small Plow Plane


Today I got to test out my new Veritas Small Plow Plane. It's an unusual looking plane that is designed to form grooves (primarily rabbets parallel to the grain). I used it today to form a 3/8" wide by 5/16" deep rabbet to receive the base panel on the wax melter project. At this it was quick, easy and efficient. Compared with a electric router it was nearly silent, was faster to set up, and produced as good a finish without the dangers (to self and timber) of using a router.


The design is fairly simple. A cast iron body is attached to two fences one to control depth (which slipped on the initial cut) and one to control distance from the edge. The blade size sets your width and are available in 1/8, 3/16, 1/4, 5/16, and 3/8". The brass locking knobs are easy to use and are comfortable to the hand. There are screw holes to attach a nicer and wider fence, but straight out of the box the handles were comfortable and blade sharp. 

An expensive tool, but a nice one. I look forward to testing it out on some huon pine tongue and groove joinery in a future project.

More Photos


Like at Facebook

Redbubble