Monday, June 28, 2010

Timber and Working with Wood Show : Part 3 - The Demonstrations

The third element to the show was the demonstrations and exhibitions. Here's a couple of highlights.

Terry Gordon - HNT Gordon Planes


Of most interest to me was Australian Quality Tools and Lie-Nielson Toolworks. How they approached their stands was very different. Nearly all day he was demonstrating with passion and was working up a sweat. It was great to see how a woodworker would actually use his tools in approaching different jobs (planing, moulding, joinery etc). The Lie-Nielson stand on the other hand had a wide variety of tools on display, and a single piece of wood if you wanted to pick one up and test a tool. A very different approach.

Stan Ceglinski - Billinudgel Woodworking Company


Stan Ceglinski is an entertaining Australian larrikin. At the show he referred the saw races, taught timber structure and design and demonstrated traditional green woodworking techniques. Using a maul and riving knife he formed shingles and bats. Check out his Official Website.

And many others...


There was many others on display, for a complete link click official list of demonstrations.

Sunday, June 20, 2010

Timber and Working with Wood Show : Part 2 - The Tools

Tools
You can't have a wood show without tools, and there certainly was a lot of them. Traditional hand tools, power tools, tools for woodworking, tools for tradies, machinery, and milling equipment were all on display. Here are some that caught my eye.

Torque Work Centre
The Torque Work Centre (www.torqueworkcentre.com) is a Queensland built precision mounting platform for traditionally hand held tools (eg. drills, routers, and circular saws). It's rigid mounting system allows movement of the mounted tool in x/y/z axises as well as rotation at the vertical column and the tool mount allowing amazing versatility.  Some of the jobs it excels at are router surfacing large boards (eg. 1.5m x 3m boards), router copying for sign making, and quick dado formation.


 For more information check out the Official WebsiteLazy Larry's Woodshop, and Stu's Shed.

Microclene
Microclean (www.microclene.com.au) is an Australian company which produce a variety of air filters. Their original cylindrical design is quite different to the traditional box designed filters. Designed to be ceiling mounted in the centre of the woodshop they draw air up through the filter in the base (filtering to 0.4nm particles)  and distribute that air 360 degrees from the top vent. This results in air active torus air movement leading to greater efficiency in cycling the air in the shop.


Shelix
Before we get onto the real tools (the hand tools) I want to mention the Shelix cutter head. This is an after market spiral head cutter head for electric planers including jointers and thicknessers. The three advantages of this style of cutter head are, markedly reduced tear out, rotatable 4 sided blades (so that if one is chipped it is simple to fix) and the reduction in noise (such that the man demonstrating can talk to you while thicknessing.) I'd love to have one of these in my shop, however for my 12" combo the cutter head is about $1200-2000.


More information at Stu's Shed and Ideal Tools.

Vesper Tools
Vesper Tools (www.vespertools.com.au) is an Australian tool company owned and operated by Chris Vesper (seen in these photos) which specializes in precision hand made marking tools. Last year I ordered a 7" blackwood square and am still waiting... 


Australian Quality Tools 
Australian Quality Tools is a conglomerate of Australian tool makers including Terry Gordon (of HNT Gordon & Co Classic Plane Company), Conlen Clenton (of Conlen Clenton Tools) producer of fine marking tools, Stan Ceglinksi (The Billinudgel Woodworking Company) producer of traditional green woodworking, timber and furniture, Micheal Connor (of Micheal Connor Woodworks) producer of workbenches and workbench accessories, Roger Gifkins (of Gifkins Dovetail Jig) and Tent from (Harold Saxon Chisel & Tool Company).

Harold Saxon chisels & Conlen Clenton marking tools


Terry Gorden demonstrating his planes

Personally, a highlight of the show was watching Terry Gordon demonstrate his planes. Watching how easily he corrected a tenon with a shoulder plane, made a continuous shaving on complex curves with his spokeshave and hand made moulding, he clearly demonstrated a passion for hand tools, fine workmanship and was clearly enjoying himself.

Second Hand Exchange
There was a couple of sites selling second hand tools. Funnily enough I ran into a number of blokes from my old woodworking club, Hastings Woodworking Guild, searching through tubs of tools. A couple rasps and planes caught my eye, but not my wallet.


Lie Nielsen
American fine tool company Lie-Nielsen also had a large stand of their tools.


My Purchases
After much research and debate, my first purchase was two Lie-Nielsen 14" tenon saws. Testing these on some scrap yesterday, as promised, they deliver fast accurate cuts. I first found the rip a little tricky has it cuts so fast it binds requiring me to re-learn not to push down into the cut but slightly ease off and let the saw to its magic. The cross cut is just a gem.


I have been looking for a new block plane and a new rabbet plane to help clean up tenons, and I found this rather nice one. The 60 1/2 Rabbet Block from Lie-Nielsen with new nickers on both sides. 


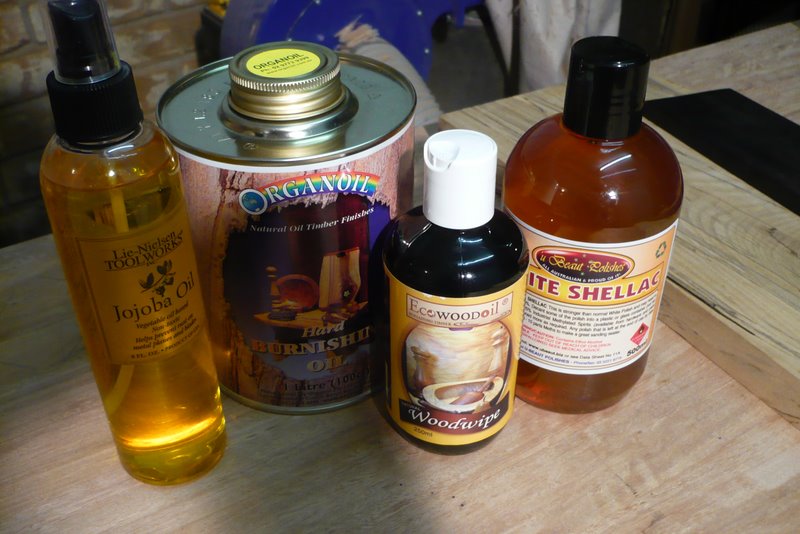
And finally some consumables, jojoba oil from LN used to lightly coat tools protecting them from rust, Organoil Hard burnishing oil (with some free woodwipe) to finish an upcoming dining table and white shellac from U Beaut I'll dilute as a sanding sealer.


Oh, and if anyone's keen to donate to my Harold Saxon chisel fund send me a email. :P

Saturday, June 19, 2010

Timber and Working with Wood Show : Part 1 - The Timber

EXPO!!!
Yesterday we packed up the forester and ventured south to the big smoke (Sydney) for the Timber and Working with Wood Show. Being the (unofficial) largest wood show in the country there was lots to see, do and buy. Overall there seemed to be an higher quality and range on offer than previous years. I'll break the trip up into a few sections looking at timber, tools, and demonstrations.

Boutique Timbers
I had a good chance to catch up with Mal & Greg from Boutique Timbers. Their offering of timber was the largest on display. It included some beautiful slabs of fiddleback cedar and camphor (which I normally avoid like plague). Have a look through the photos for the diversity and quality on display. If you haven't yet, it's well worth your time to check out their site www.boutiquetimbers.com.


Other Suppliers
Other timber supplies on offer included Tasmanian Timbers, Cedarworks, East Coast Specialised Timbers, Island Specialty Timbers Tasmania, Timber & Burl Liquidation, Trend Timbers, and Wild Wood Gallery.


I wanted to include this photo to demonstrate the diversity within a species of timber - in this case blackwood (acacia melanoxylon) from Tasmanian Timbers. Due to different growing conditions, different nutrients in the soil, different climates, and different genetics significant variation can occur. This is why it's important to actually see the timber you are buying, and then to carefully match timbers or using the differences intentionally with design in mind.

My Purchases
Well I can't say that this is largest timber order I've ever made but I made two interesting purchases of timber I haven't used before. The first from Trend Timbers is a piece of real ebony (diospyros dendro) which is for accents my next project a shaker table, and yes it was $79. The second is blackheart sassafras (atherosperma moschatum) from Wild Wood Gallery which may end up as drawer fronts on an upcoming tool cabinet. (To give an idea of sizes the bench holes are 3" apart.)


Wednesday, June 16, 2010

Sharpening: how I do it.

Sharpening
It cannot be overstated how paramount the sharpness of your tools is to the quality, speed and enjoyment of your woodworking. Like most however I can't say sharpening the most enjoyable aspect of the hobby. My tips to make your sharpening easier and less painful are: find a system you like and get good at it, have a dedicated space or have equipment close at hand, and remember small amounts often is easier.

My Set Up
There is lots of great information about the many sharpening systems out there, I won't try to repeat it all. However, I will tell you how I go about sharpening and hope that helps. Here's what I use:


My plans to build a dedicated sharpening station are yet to come to fruition, so until then I simply keep my equipment handy and in dedicated trays/boxes. '

My System
Sharpening is essentially shaping the metal to form two uniform surfaces converging at an apex. The more uniform the sharper. Here's how I do it.

  1. Flatten the back - I place the blade's back flat on the stone and moving it in a circular motion moving from 500grit to 4000. The back is the first of the 2 cutting surfaces that will meet at an apex.
  2. Establish the primary bevel - using the honing guide (at 25 degrees) and the 220grit stone I grind the primary bevel (this is not a cutting surface.)
  3. Establish the secondary bevel - using the honing guide (at 30 degrees) I use stones 500 to 8000 to produce a polished steeper bevel forming the second cutting surface.
  4. Flatten the back - repeating the flattening step at 4000 removes the burr formed by grinding the secondary bevel, this angle can be increased by using a small ruler to create a secondary back bevel.
  5. Cleaning - I use paper towel to wipe the slurry from the blade (formed by the stone, water lubricant and metal grindings), I use metho to clean and dry the metal, and wax to protect the blade from rust and lubricate the base of the plane.
Easy.


Online Resources

Sunday, June 6, 2010

Leg Vices

Vices
The Blackbutt Roubo has three bench crafted vices. A stationary modified glide vice, a sliding glide vice, and a wagon vice. A few minor innovations make my vice layout unique (well as far as I know.)

  1. A modification to the wheel mounts allowing laterally orientated bolts allows a reduction in height. Handy, to allow the parallel guide mechanism is contained under the bench. (The real benefit of this is seen on the sliding vice, keeping the parallel bar away from the storage shelf.)
  2. The sliding vice is mounted on 4 wheels. This allows a super smooth lateral action.
  3. Steel re-enforcement. You can read about that in earlier posts.
  4. Other modifications are purely aesthetic choices, inspired by our local church.


Leg Vice 1: Left Leg


 Leg Vice 2: Slide baby slide
 Smooth action. I'm yet to attach the chop.


Some installation photos


Like at Facebook

Redbubble