Wednesday, September 21, 2011

Letter of the week: Andy on the Roubo


Hey Dan,
My name is Andy and I'm about to begin making my own roubo workbench. I have been particularly interested in your build as I'll be using blackbutt from Mal Ward also (arrives Wednesday).
I was just wondering how you found working with blackbutt? And if you got much tearout when planing, and how you dealt with it? I have a few high angle planes which should help working with this dense timber.
Andy

Thanks for the email Andy. With a few details to go, officially my Roubo Workbench is a work in progress. That being said it remains a workhorse of my shop. I never considered it a work of art, it's a little rough, has some tear out (and now scratches), but is solid and works well.

There are pro's and con's to using Coastal Blackbutt. Advantages include being light in colour, solid, hard, and heavy (900kg m^3). Disadvantages include it's plain, solid, hard, and heavy (900kg m^3).

It was hard to work with tools. On average metals (such as my cheap chisels) at 25 degrees I found they would blunten within 5-10 blows. My planes would noticeably not cut as well after 5minutes of work. I would suggest using harder metals such as A2 steel if you have them, higher angle bevels (say 30-35), and sharpening often.

I only had one section that had significant fiddleback which was difficult to tame. My standard angle planes managed ok if I kept them sharp, a radius on the blade, and sole waxed. A high angle plane will reduce tear out but increase work on you and the blade. Like all things you'll need to trial it and see how you go.

Although I try to concentrate on hand-tools I would recommend using as many powertools has you have. I used a 3HP planer for machining and belt sander to solve some tear out issues.

Good luck with the project. I'm keen to hear how it goes. Let me know if you have any other questions.

Sunday, September 18, 2011

The clock that ran out of time...

After three days of solid work in the shed the clock remains incomplete. Although I can appreciate the irony of the clock that ran out of time, I'm disappointed to have missed the delivery date and tomorrow I go back to work. 

Here's the progress to date. 


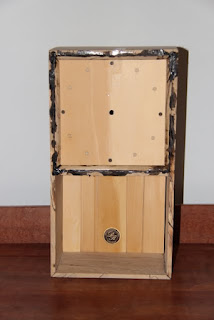
There's only a few things to do. I need to sand back that messy glue. Attach the clock-face. Final sanding. Install the movement and hands. Attach the half-lap back. And oil. So close but so far away.

Friday, September 16, 2011

Half-lap huon


The back of the clock is formed by half-lapped 9mm huon pine strips. I made the rabbets which form the half-lap with a veritas small plow plane.


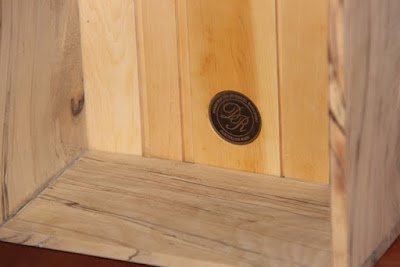
After sanding to 240 grit with the random orbit sander I took the time to insert my marker. A 35mm forsner bit and a little epoxy made easy work of that. (Easier then when the case is assembled.)


The strips are intentionally irregular sizes - intentional imperfections. It adds a charm to a simple modern style.


A little sneak peak. The clock face is now sanded and the plugs flush. 

Clock Carcass


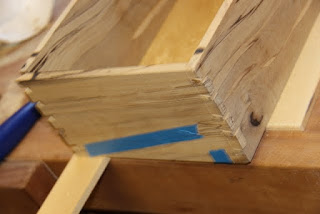
The main carcass for the clock is made from Blackheart Sassafras. The "Blackheart' name reflects the timber's variegated colour formed from fungal spalting. Although an attractive timber it proved exceptionally difficult to work. Although the timber is soft (yet somewhat fragile) the spalted lines were considerably weak especially in the thin 9mm pieces. Several times while working the wood large pieces would split and fall apart. In the following pictures you'll see where I've epoxied and taped it back together.


Before resawing I attempted to stablise the timber by filling any voids with black epoxy. (Much like I did in the background with brown epoxy and blackbutt burl.)


The board was re-sawed into two 9mm boards. (See previous post for details.)


The corners of the carcass are dovetails. (See previous posts on how I dovetail.) The front and rear pin/tail are mitred to hide the back rabbet and match the clock moulding.


Not a very good photos but you get the idea. The bits of tape tell you there was multiple splits in the timber.


A small shelf lies halfway up the case to hold the base of the clock. The gap behind the shelf is intended for a hand to adjust the clock movement.


The inside moulding is mitred 9mm round over sassafras which will hold the clockface. The moulding was rounded by hand with a no 7 plane and sandpaper.


The glue up was messy. I used epoxy mixed with micro-fibre filler and black oxide concrete dye to produce a black gel. I opted for this method as I've run out of PVA and the black lines that remain after sanding match well with the blackheart sassafras.

Thursday, September 15, 2011

The Clock Face


A striking feature of the Tasmanian Timber's Clock is the Huon Pine clock face. Twelve 1/4" wooden plugs made from Blackheart Sassafras and Ebony form the hour markers. Here's a few photos of it's construction. 


The first step was preparing the timber. After initial machine milling, resawing was needed. I used a circular saw to make a grove on each side, then used a hand saw to cut through the 265mm piece of huon. This took a few sessions and my arm is still feeling it. 


The two halves cleaned up beautifully after a quick trip through the planer.


The plugs were quick work with a 1/4" snug plug cutter and a bench drill. 


The layout was straight forward. The face is 200x200mm. The centre was found by diagonals. Lines then made at 30 degrees. A compass set to 90m made the plugs too close to the edge, but 85mm worked well.


Back to the drill press, the centre was drilled out to take the movement. Then a dowel trimmed to size acted as a pivot point to ensure all the plugs were even from the centre.


The plugs were then glued with epoxy. Ebony was used for 12, 3, 6 & 9. Sassafras for the remainder. Now I just have to wait for the glue to set and then sand it all back. Not bad. 

Wednesday, September 14, 2011

Time to clean the shed...


Yes, and posting this is yet another form of procrastination.

Like at Facebook

Redbubble