Sunday, July 11, 2010

Tenons Saws

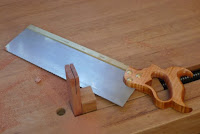
After much debate, at the Sydney Wood Show I purchased the Lie-Nielsen 14" in 13TPI Rip and 10TPI Crosscut Tenon Saws. Out of the box these are beutiful tools. Soft curly maple handles. Folded brass backs. Clean and simple lines.


The conclusion of my research was that all the leading brands (LN, Veritas, Bad Axe, Adria, Wenzloff & Sons) are exceptional quality tools. I decided on on the LN saws because of two factors variety and avalibility. HNT Gordon only supplies the smaller tenon saws and the other brands I would have to import. I chose the 14" for personal preference as I my prefer slighly oversized tools.

Have you ever found that there are some people you just connect with instantly? It was like that for me the the 10tpi crosscut. Using this tool can be alikened to slicing fresh bread with a sharp bread knife. It easily, quickly and cleaning makes it cut.


On the other hand the ripsaw and I are still getting to know each other. When compared to my previous Stanely tenon saw this saw cut very aggressively. So aggresively it digs and jams. I found that not only do you not have to force the saw through the cut, you in fact need to ease some of the weight of the saw itself. After cutting a number of tenons for the shaker table bracing we are now starting to get along better.

Saturday, July 10, 2010

Ewww Pretty...

The center pieces for the Shaker Table is fiddleback (an alternating grain pattern) Tasmania Myrtle (Nothofagus Cunninghamii). Although, I've had the timber for 12 months, only now that it's dressed I can start to appreciate the colours and grain.  In these photos I've splashed the table with some methylated spirits to show how the timber would looked like oiled.


Timber sourced from Boutique Timbers.

Thursday, July 8, 2010

Sticking Together

Glue Ups
Glue ups are the easily the most stressful time of any project. Everything needs to fit firmly without the slightest gap. You need to glue all the joints (often on both sides) and apply all your clamps. And depending on your glue you have 10-20min to do it. If you get stuck half way it might mean pulling the joints about, scraping off the glue, and restarting. Glue ups also seem to be the time I hit my head on machinery, trip on a clamp or any other assortment of stressful moments.

The Myrtle Table
The first step is assembling your four square nicely jointed boards for a dry fit. For this project I used titebond III glue.


I like to work small sections at a time. So I began by gluing boards into pairs.


Now with only 3 sections I glued the fiddleback boards together with sash clamps and F clamps to hold the boards level.


The final stage was adding the 40mm edging pieces.


Added stress:
This glue up was complicated by some unforeseen problems. The lid on my glue pot (an old mayo bottle) came off twice. First dumping ~70ml of glue onto my project. Then ~150ml onto the floor. Stress. Then one of my joints didn't work and it feel apart. This was probably related to not extending the period of clamping in light of the cold weather. Possibly (hopefully not) related to old glue.


Gluing Tips
  1. Always do a dry a fit. Always. Put everything together without glue and make sure it fits firmly with out a slight tap or pressure.
  2. Have all your clamps, cawls, and protective scraps at the ready.
  3. You can always use more clamps (usually you'll need a clamp at least every 30cm.)
  4. Understand your glue. Wood glues (eg. PVA) absorb into the wood and cross link. Zero gap is good for these glues. Epoxies can bridge small gaps and act as space fillers. Hide glue is warm water soluble which has advantages and disadvantages.
  5. Glue up in stages. By gluing small sections together, and then joining those sections, you'll reduce the amount of wet glue surface at any one time and reduce the number of clamps needed.


Tuesday, July 6, 2010

Getting Dressed in The Morning

The first step in furniture construction involves transforming the rough timber (cut in a paddock from a fallen tree and then air dried) into flat and square timber. This process is called 'dressing' the timber or because it is often done by machine 'machining'. 

Step 1. Jointing
The first step in this process is called 'jointing'. The key concept in this process is to find a surface you know is flat and then you make you timber surface parallel to it. In this process a long bed plane is used to remove the peaks in the rough timber. (The ideal length of the bed is twice the length of your timber so it is supported at all times.)


In this set up I am using a 3hp 12" woodfast combo machine set up in jointer mode with a roller outfeed table. The rotating cutter (below the aluminum guard) is beneath a large flat iron surface. Moving the rough timber over this surface removes small amounts of the peaks of the board (~1mm). By repeating this process eventually all the peaks are removed and you end up with a flat surface.


This process can also be done by hand. (The next time you see a piece of very old timber building or furniture, all that timber would have been prepared by hand.) A long hand plane (normally, no 7 or 8) is used to remove the peaks. This requires constant checking to monitor your surface and stay square. (Winding sticks, a straight edge, and a small square are invaluable accessories at this stage.)


Occasionally, you'll have a board that is twisted. Opposite corners will point one way causing the board to rock. If you don't recognize this the board can rock on the jointer which will fail to flatten. The fastest way to fix this is to use a jack plane (no 5) to quickly flatten the corners. Another trick is with cupped or warped boards; always plane the curve concave down so it doesn't rock in the middle.

Phase 2: Thicknessing
After you have jointed two surfaces (a face and an edge) forming one square corner you can move on to thicknessing. Thicknessing is the process of planning the opposite edge making it parallel to the one you just jointed.


Machine thicknessers (see the woodfast combo now in thickness planing mode) uses a cutter head above the piece you are planing to cut a certain distance from your flat surface. If your surface is not flat you simply copy this to the other side.

Step 3: Sawing 
Now we have 3 edges square and flat. (If you can balance the thin edge of the board on the thicknesser you can use it to set the width of your board. However, normally this will be too thin do this safely.)


To cut (rip) the width of the board I use my circ. saw and a guide set at the distance required. (This technique is obviously less accurate than a table saw but much faster than cutting it by hand.)

Now you have a board that's square and flat on four sides, also known as 'four square'.

The Shaker Table
The process of dressing allows me to take rough timber which has twisted and warped as it's dried...


...and form beautiful flat and square timber ready for joinery.


Sunday, July 4, 2010

Myrtle Anniversary Shaker Table

Wood is the traditional present to celebrate 5 years of happy marriage. With this inspiration I've decided to make for us a family dinning table in the same style as the shaker trestle I built in 2008 (blog | forums | Lumber Jocks.)


The timber (from Boutique Timbers) is Tasmania Myrtle (Nothofagus Cunninghamii). I have 6 x 1" boards of fiddleback, and 6 x 2" slabs (with faults) to make the project from.


The overall style will be the same as the 2008 Blackbutt table with a few modifications The size is slightly larger 2m x 1m (cf: 1.8m x 0.9m) to seat 8 comfortably. The legs will be slightly wider, but the same height and shape. The top is quite different. The centre boards are only 20mm thick dressed. To strengthen the top I will be edging the top with 40mm stock and have cross braces underneath. (Don't worry I've taken into account wood expansion.)


I haven't decided on chairs or table. I would love shaker chairs, but lack a lath and time. I love the communal feel to having benches compared to chairs. The main problem I heard from the 2008 table are the lack of backs on the benches.

Saturday, July 3, 2010

The Bench in Action

Myrtle Anniversary Shaker Table
Today I started work on a new project, a shaker trestle table (similar to one I made in 2008) to celebrate our 5th year wedding anniversary. This proved to be a great opportunity to test out the new bench.


The Wagon Vice
The wagon vice is a very versatile carriage style vice which replaces the standard shoulder vice. I'll have more pics of its installation soon.


Here I am using the wagon vice to secure a piece of tas. myrtle I'm about to machine. With the piece secure and the no. 5. freshly sharpened I'm able to quickly remove the tips of a twisted board. Doing this prior to taking it to the machine reduces the number of times you need to feed the board, making everything faster.


The slightly less traditional use of this vice is to allow me to secure pieces for power tools. This piece, resting on some scrap pine, is held safely to allow me to trim the edge of this board.


The Leg Vices
With the sliding leg vice I have a maximum screw to screw distant of 1.65m. This allows quick and easy clamping of long boards.  


Here I'm using a no. 7. plane to joint (or flatten/straighten) the boards prior to gluing.

Thursday, July 1, 2010

Bench Update

Twelve months into the Blackbutt Roubo build it's still not finished, but it's getting closer. It might be a bit pre-mature but let me take you on a quick tour. 


The final dimensions are 264cm (long) x 66cm (wide) x 83cm (tall.) The top is solid at 10cm. The legs are 17cm (wide) x 15cm (deep.) As mentioned before the timber is coastal blackbutt which has a dry weight of 900kg/m3; which makes the top ~150kg, each leg ~17kg, plus the shelf, plus the vices.... I estimate it just shy of 300kg.


The static leg vise is functional (leather detail and leveling the top remains), the sliding leg vice slides (but is missing the two countersunk bolts which holds the vice to the chop), and the wagon vice carriage is installed (but I haven't installed the screw or trimmed the end cap.) 


A few details remain - leather details, a bolt or two, a tool rack, a little rounding and oil. Oh, and i was planning some detachable wheels.

6 Piece Burr Puzzle Jig: Revised

A Christmas ago I was slowly hand making 6 piece burr puzzles as gifts, but as the weekends past I needed a faster method. The router jig design I came up with enables accurate and fast reproduction of burr puzzles. Using accurate spacer blocks (made in shop), accurately milled square timber, a router and router table and a bit of planning you can produce a burr puzzle in minutes. The best website for plans and patterns of puzzles comes out of a IBM Research Group.

Click for details: 6 Burr Puzzle Jig


To understand how it works you need to know a little about the puzzles. 6-Piece Burr Puzzles are a popular wooden riddle made of 6 interlocking pieces which are moved in a certain order to allow assembly and disassembly.


Puzzle difficulty varies, some require one or moves to release a piece, whereas Bruce's Love Dozen requires 12 moves before the first piece is removed.


A standard piece can be thought of as 24 small cubes half the width of the piece. The interlocking piece is created by removing cubes in a certain pattern. (More advanced patterns remove single cubes which requires handwork, like a half blind dovetail.)

Each piece in the puzzle must be the same size, but sizes may vary. In my case pieces 20x20x60mm worked well. This made each of the little cubes 10x10x10mm. I recommend choosing a size twice the width of a good router bit. Take time with the milling, it needs to be accurate, or slightly under, to allow the pieces to move easily.

The jig's T shape design allows the piece to meet the router at 90 degrees by running along the router fence. Mine is constructed of scrap pine and plywood. Few of the exact measurements are important. The slot must be accurate to the width of your piece so there is no wobble. The router piece must protrude from the table far enough to remove the cube section in one pass. In my case 10mm above the ply. The slot is produced on your first pass.


You can see how the cube lines up in the slot and is carefully removed by the router. By using various spacers (seen here as the grey block) you can repeatedly remove the various sections. (I used a dozuki saw, sander and caliper to make my spacers. A well tuned shooting board would also work.)


Once you have your jig and pattern the process is rather easy.

  1. Lift the router to a height where a single pass will remove half the width of your piece. 
  2. Select a side to start with.
  3. Select the correct spacer to remove required  row (2, 3, 4, or 5.)
  4. Firm against your fence push the jig through the router (careful not have hands behind the jig, for improved safety and accuracy I used another piece (seen in blue) to hold the piece down and towards the fence.)
  5. Replace the spacer if another row is needed to be removed, repeat as need.
  6. Rotate to the next side, and repeat steps 3-6 as needed.
  7. A little sanding, a little oil, and you're done.


As an upgrade you could make multiple slots allowing multiple pieces to be cut in one pass.


Maker's Mark


Maker's Mark is small UK company specializing in small production runs of brass & stainless steal name plates specifically for custom made furniture and cabinetwork. 

After giving up on my search for such a maker I came across the name in the back pages of Fine Woodworking. When I mentioned it on the Australian Woodwork Forums, people (including Mark Aylward from The Solid Wood & Furniture Company) were overall very positive.

The above design is an example from their site I liked the most. Modifying it to fit my own purposes we came up with the following four (25x1mm and 35x1.5.) In the end I decided to order 30 of the 25mm with capital letters at a cost of 64 pounds (delivered.) 


Alternatives to namely your furniture are hot brands, custom punches, pyrography, and pens/pencils.

Like at Facebook

Redbubble