Other Blog Pages

Saturday, June 18, 2011

Myrtle Anniversary Shaker Table, finished!

As a gift for my wife for our fifth wedding anniversary I’ve been slowly working on a Shaker inspired dining table. Although it needs a final wax the table has already found its way into our home. (7 months after our anniversary…)


The table is made from Tasmanian Myrtle (supplied by Boutique Timbers) with Indian Ebony accents. The top is 1m x 2m. The central boards are of 20mm fiddleback the edging 40mm of the more straight grain. The top is stabilised with a two large breadboards and two braces beneath.


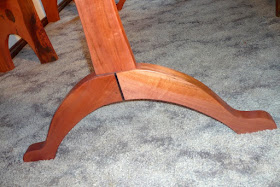
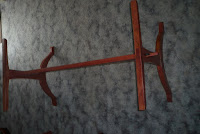
The feet are angled 40mm Myrtle joined together by a handcut sliding dovetail, and to the central post by a twin wedged tenon. The leg stretcher holds to the legs by a ebony keyed through tenon, allowing the legs to be removed and laid flat for transport.


The benches can cater for eight diners in comfort or ten on a squeeze. The 40mm timber is joined by halflap joint, screws and glue. Solid. The curved table legs allows foot room for people sitting on the ends and the central stretcher keeps well away from anyones knees. The is a single 10cm back support for the lumbar region. The sit depth is limited to 300mm (due to my planner width) which I wish her 400mm for more thigh support.


Click for details: Myrtle Anniversary Shaker Table

For more photos and detailed documentation of the work in progress check out old posts – the love of wood - Shaker Table #2: Tasmanian Mrytle.

Monday, June 13, 2011

Edge to Edge Mitres with Roy Underhill

I started thread over at Woodtalk Online about how best to strengthen the long edge to edge mitre joints that form the lectern's column. Bob Rozaieski (of Logan Cabinet Shoppe fame) pointed me to this helpful (and free) video by Roy Underhill (of The Woodwright's Shop fame). Thanks Bob.


Flat Pack Furniture

I don't have a lot of 'flat pack furniture.' Most of the time I stay clear of Ikea. But there's not reason that custom solid timber furniture can't be solid when assembled and conveniently flat when transported. 


Lectern Design


With the Shaker Table complete it's time to ponder my next few projects. After a big shop clean up and the construction/installation of the lumber rack I'll be working on some furniture projects for the local church. The first and most complex being a lectern.

The design brief: simple single column construction, adjustable in height (0.9 to 1.3m), table to hold 2 A4 pages, and two XLR panel mounts for gooseneck microphone and LED light (with cabling tunneled within). It will of course be solid timber (cedar and huon most likely), dovetailed base and top, and probably an inlayed cross.

Getting the proportions and the visual weights of the different elements I see as the  biggest challenge.


Sunday, June 12, 2011

Groggy's Workbench


In August 2008, hobbiest woodworker Groggy, started working on a humble roubo workbench in Melbourne. Over the past 2 years his documented the build in detail over at the Woodwork Forums. The Bench is 2520 x 650 x 140mm and made from solid Jarrah. He estimates the bench weights in at 200kg. It has a Bench Crafted wagon vice and a sliding deadmen. A unique feature of his bench is under the flush shelf is a purpose built parallel clamp rack. Very handy. There's a still a few things to finish off, but it's already a fantastic bench.

Picasa SlideshowPicasa Web AlbumsFullscreen

Click here to see the complete forum thread (you'll need to be registered user to see photos and join in discussion.)

Tuesday, June 7, 2011

The top attaches to the bottom...


Transporting a 2x1x1m table is an epic task. Not only is the weight a hassle, moving it through downs and around corners becomes near impossible. To make this easier the table is design to break down into pieces. First the legs are held together with the keyed tennons (easily tapped into place) and then screwed/bolted up into the tabletop.


The first step in the process is the supports beneath the table. Four 20mm supports stretch under the table and support the thinner (20mm) fiddleback mid section to the thicker 40mm edge pieces. Slotted holes allow for horizontal wood movement while simple brass screw stay in position. Because these sections won't normally need to be removed a screw works well.

Connecting the legs to the support is a different story. These need to be able to tightened and taken apart multiple times over the lifetime of the project. Threading the wood or inset nuts are ok, but I find they wear and fail. 


For this project I'm using 3/16" brass nuts and bolts. I used the leg to mark where to drill. Then counterbored with a forsner bit. With the support removed from the table I could tighten the bolt while holding the nut. Then I filled the counterbore with... epoxy. Leave to set. (Not forgetting to remove the bolt.) A quick sand and oil. And we're done.


Sunday, June 5, 2011

Refining the Center Stretcher

Construction of the Anniversary Shaker Table is in the home stretch. Today with the stretcher held securely to the bench I could finish some of the details. A nicholson fine rasp, a cheap riffler and some sand paper made quick work of rounding the edges and fitting the joint.


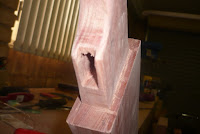
Holding the stretcher to the legs are keyed through mortise and tennon joints. I made the ebony keys quickly with a chisel and saw. Although a quick and fun way to build... the lack of planing caused one small hassle. A combination of a slight difference in the angle of the key and mortise and leaving the short grain too short caused a small blow out at both ends. The solution... it's now a design feature...

Wednesday, June 1, 2011

Oiling the Benches

Progress may be slow, but progress is progress. One bench is finished and in the house. The other is finished and airing in the shed. Yesterday I put the last coat of oil on it. Using 0000 steel wool I rubbed in a third coat of Organoil wiping the excess with paper towel. After a month or so I'll come back an add a very thin layer of wax. Now onto the legs for the table...