Other Blog Pages
▼
Saturday, May 21, 2011
Woodworking on Holidays: Queensland Museum
Next door to the Queensland Art Gallery is the Queensland Museum. The Museum had a very extensive collection of natural history (including Dinosaur fossils discovered in Queensland) and human history (including household items from before Christ). It also had a number of wooden items.
Friday, May 20, 2011
Woodworking on Holidays: Queensland Art Gallary
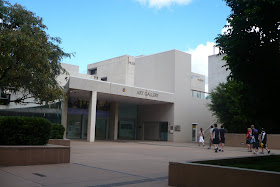
Just a few photos from our recent trip to the Queensland Art Gallery. On display was a variety of wooden pieces representing several eras of Australian history (pictured below) as well as some historical international pieces. The Gallery itself was easy to access and quite pleasant to stroll around.
Saturday, May 14, 2011
Experimental Filling...
The first thirty minutes of shop time I've had in 6 weeks was spent reviewing the pews. It gave me an opportunity to see the results of various filling experiments I tried on the project. (Of course it's recommended do technique 'experiments' on scraps prior to the actual project, but this time it's on the project.)
The first 'filling' job was the plugs to cover the screws. Made with the Veritas Snug Plug cutters from Indian Ebony these proved to be highly successful. (But ebony is not cheap). The plugs simply tap into to place and hold with glue. To finish simply flush trim and sand.
The first Epoxy experiment was done using the west system microfiber system. The microfiber in fine powder forms acts to thicken the glue and allow better filling properties. However, this also tinges the filler white... not such a good look.
Next up with have microfiber with fine saw dust. Allow I've had success with this technique in the past this time it made the filler appear heterogenous (ie. tinged white with flecks of reddy brown). Better but not there yet.
My final option was black oxide. This carbon like powder is designed to colour concrete and is dirt cheap. Used with or without microfiber it made a solid homogeous filling agent. Perfect... well if your wanted black any way.
Defects that were exposed to the element while the tree was standing often have a black edge. I presume this is related to oxidation within the wood. Filling these gaps with black filler is effective.
For other colours, such as to match the reddy brown, I would try even finer saw dust (such as that out of the sander) or turn to dyes and stains to turn that white tinge what ever tinge you want.
Epoxy has a significant advantage over water based fillers such as 'putty' - strength. Epoxy can seep into the defect, completely fill it, then set harder than wood, holding the defect together. This strength is essential to fill large defects and stablise burls.
Thursday, May 5, 2011
Woodworking on Holidays: HNT Gordon Smoother
A smoothing plane is an incredibly useful tool for both hand tool and power tool enthusiasts. Presently I lack a dedicated smoothing plane (instead using a no 5, or abrasives.)
After much inward deliberation and hands on comparison at the Sturt Open Day I decided the HNT Gordon a55 was the plane for me. (The other main option was the LN 4 1/2, however, the handle configuration was crowded and less comfortable and the cost greater.)
Unfortunately, the day I was passing HNT Gordon the shop was shut for Easter... so I'll wait for the next wood show...
Hmmm. That wasn't the best of stories. Oh well... always happy to plug a quality Australian producer.
Woodworking on Holidays: A tree house of note...
A four week break over the Easter period has enabled us to make a 2500km road trip around New South Wales and into Southern Queensland. Certainly more time was dedicated to building sand castles than woodworking but there were a few woody things of note.
The first wood object of note is this tree house found at the Macadamia Castle. A truly impressive multi-story tree house with multiple entry points and a upper tower fort. Although the tree seemed now deceased I was impressed but the amount of tree growth engulfing the added wooden structure.


