Other Blog Pages

Tuesday, November 30, 2010

Solar Wax Melter: A tool for Apiarists

What is a Solar Wax Melter?!
Over the past few weeks I've been working on my version of a solar wax melter. A wax melter is a tool used by apiarists (beekeepers) to clean to old wax/honey off wooden frames. Essentially, the frame is placed within a wooden box and the temperature increased to the wax's melting point (~50-60 degrees) at which point it melts off into a collection point below. With a glass top and black sides a solar wax melter uses the sun's energy to achieve the desired temperatures.

Designs
There are various designs available on the internet from a simple foam box with a second hand window frame resting on it to more complex stainless steel models. The limitations of most of these designs however is that they hold only a single frame a time. The design brief for this project outlined the need to hold eight frames, that is an entire box.


(Design by Bee Source)
(Designs by Dadant

(Design by Envrotom)

My Design
After a few sketches and discussions we came up with this design. The eight frames are arranged on steps at ~30 degrees. (The angle is to allow for maximum sun exposure throughout the day.) Although the vertical design would limit the direct exposure of the frame to the sun the temperature within the box will still achieve desired melting temperature.


This sketchup design only includes the top half. The box is to be extended below to include 1 or 2 filters, the collecting tray, and a back door to allow the access to the tray and filters. 

Sunday, November 28, 2010

Dovetail Glue Up


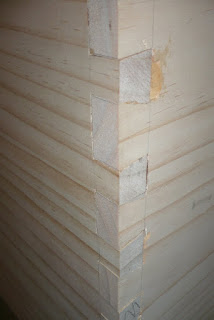
With the dovetails cut today it was time for the glue up. Titebond III, a mallet, and some clamps.

Wednesday, November 24, 2010

Ax-Men (TV Series)


There's not much on the TV in the way of woodworking now-a-days, but there is Ax Men. Ax Men is a docu-entertainment series that follows 4 logging companies in the USA. It follows the new, the experienced, and the downright crazy.

You can find it on 7Mate on Friday nights, or online at Ax-Men on Plus 7.

Sunday, November 21, 2010

Stefang's Dovetail Tip


After my last post on dovetails, I was pointed to a tip for closing small gaps by a fellow Lumber Jocker. I hadn't seen this before and thought it was worth sharing. I'll let Stefang explain it in his own words - link to his LJ Blog.

Friday, November 19, 2010

Dovetailing

Dovetailing the 860mm sides of the Wax Melter is no mean feat. Fortunately since my first attempt at dovetails in 2007 I have a few new toys and am no longer using tool boxes to support the sides of the piece.


The twin leg vice combination truly excels at this task. It securely holds edge side the entire length of the vice. (I did notice some flex in the middle of the pine board which required stablisation with my left hand.)  


A 2cm tail is marked every 5cm. I used the Vertias 1:6 dovetail marker, a mechanical pencil, vertias wheel gauge, and a 1m rule to achieve this. You'll note that both sides are in the vice allowing me to cut tails on both boards at once speeding production.


This is the first time I've been able to test my new Wenzloff & Sons Dovetail saw. A nice tool to handle and quick to use. 


Both sides complete.


Using eclipse blades in a stanley coping saw I removed the bulk of the waste.


I then cleared up to the waste with a chisel. I used the cut tails and a vesper marking knife to layout the pins on the corresponding board. The pins were cut using the same above technique.


One side complete. Three to go.


I do have to show some errors though. (Fortunately this project is to be painted so the final product will not be effected.)

Left: You can see the rabbet for the base board. Ideally this would be a stopped rabbet or mitred so it cannot be scene. I'm intested in about others would get around this project.

Right: In some of my earlier chiseling my chisel wasn't sharp enough and I had some resulting blow out and damage to the surface some of which will need some putty filler. 

Wednesday, November 17, 2010

Christmas Boxes: Flattening the Sides

Flattening the Sides
The timber in this project was purchased as 'dressed-all-round' (or DAR). This is meant to mean that each edge side is flat, parallel to the opposing side and square to the edge. For several reasons this is never the case. The timber is processed probably years ago in a production line in a climate different to my own. The changes to moisture content as it dries further allows wood to do it's think and warp, cup and twist. Crosscutting the timber into smaller pieces  changes the internal tensions within the board allowing new movement. And the mass produced aspect means that care is not taken with individual boards.


To begin with I tranverse (planing 90 degrees to the average grain direction) with my Stanley No 7. The blade (which is original) I have sharpened with a chamber (curve) to scoop the grain. Tranversing results in small areas of tear out. 


The next step would be using a jointer or a smoother plane to make passes at 45 degrees and then parallel to the grain. The process needs constant checking with straight edges and winding sticks to make sure you're still flat. But I don't have a good smoother... so it's back to the power tools.


Using a belt sander (Makita 9924DB) I first traverse and then move parallel to remove the plane marks.


Using a random orbit sander (Makita BO5021KX1) I then remove the belt sander marks.


In the end I have four boards 540mm x 860mm ready for joining.

This technique is not perfect, but it works. Hand planing to finish would be faster, more enjoyable, less dusty, and result in a better finish. (Though care must be taken for tear out.) However, you need a finely tuned smoother which I just don't have. Did I mention there is a wish list on this site....

Sneak Peak: The Next Step - Dovetailing the Sides


The sliding leg vice comes into it's own...

Monday, November 15, 2010

Tool Review: Veritas Small Plow Plane


Today I got to test out my new Veritas Small Plow Plane. It's an unusual looking plane that is designed to form grooves (primarily rabbets parallel to the grain). I used it today to form a 3/8" wide by 5/16" deep rabbet to receive the base panel on the wax melter project. At this it was quick, easy and efficient. Compared with a electric router it was nearly silent, was faster to set up, and produced as good a finish without the dangers (to self and timber) of using a router.


The design is fairly simple. A cast iron body is attached to two fences one to control depth (which slipped on the initial cut) and one to control distance from the edge. The blade size sets your width and are available in 1/8, 3/16, 1/4, 5/16, and 3/8". The brass locking knobs are easy to use and are comfortable to the hand. There are screw holes to attach a nicer and wider fence, but straight out of the box the handles were comfortable and blade sharp. 

An expensive tool, but a nice one. I look forward to testing it out on some huon pine tongue and groove joinery in a future project.

More Photos


Saturday, November 13, 2010

Progress on the Christmas Boxes

For Christmas this year I'm making 2 Blanket Boxes (Toy Chests for the kids) and a Wax Melter. The materials (radiata pine) and construction (dovetailed solid timber) is fairly similar so I've working on them together.

Step 1 - Purchasing the Timber


I purchased the timber (with an extra few boards) from Bunnings. Fortunately they must have had new stock in and the boards I selected were actually close to flat and without major defects or many knots.

Step 2 - The Rough Cut Battle Plan


After marking out all my cuts (with margin for error) I then rough cut the pieces using my Makita Jigsaw.


Step 3 - Jointing

The boards were close to flat from the shop. Although, I would normally still go through the processing of dressing the timber (jointing and thicknessing) this time I decided I would hand plane the faces after glue up and would use the machines to do the edges.

Step 4 - The Glue Up


With a new bottle of Titebond 3 I started on the 16 separate glueups required for the projects.

Tool Review: Carbatec CT-2042 1PH Truly Sucks


Yesterday I set up my new Carbatec CT-2042 1PH Dust Extractor (with the CT-2042-P Economy Pleated Filter Cartridge) which replaces the smaller 1HP FM 320 model I've had for years. This model moves nearly 2 1/2 times the air (and hence more wood chips & dust) as the smaller model (1500 cfm vs 650 cfm.) The pleated cartridge filters finer particles (3 microns vs 5 microns) with 700% the surface area leading to greater efficiency. This machine is much more appropriately sized for my 12" thickenesser. It also will allow upgrades including capacity to run large bandsaws and tablesaws and connect to 6" ducting directly from it's inlet. After doing my research I think this model represents the best value for money on the market. Hopefully I won't be proved wrong.

There's often talk on the forums about the poor service at Carbatec. However, I have to give them credit for this job. They remembered me from the last order. Gave me a discount ~10% just cause I asked. And had the product shipped and delivered within 24 hours of order. Good job guys.

motor 2hp 240v 1 phase
CFM rating 1500cfm
filter bag fitted 5 micron
filtration bag type needlefelt
collection bag type cloth
hose inlet diameter 100mm
number of inlets 2
workshop footprint 686 x 834 x 1981mm
net weight 57kg
shipping weight 62kg

Wednesday, November 10, 2010

Sold: 1HP Dust Extractor $80

It's time for a spring clean up and I'm selling my trusty 1HP Carbatec Dust Extractor. Asking price is $80  and is pick up only from the Newcastle Area. I purchased the machine in 2007 from Carbatec and have had no problems with it since. It is capable of managing light passes on a 12" thicknesser and would be ideal for a 6" jointer, or 14" bandsaw. Performance would be enhanced if you purchased a new filter or upgraded to a pleated cartridge. I'm still using the original plastic bag (replacement is available from Carbatec). The vertical filter support bar is missing, but this does not effect function. I still have the original packaging. E-Mail me if interested.


motor 1hp 240v
CFM rating 650cfm
filter bag fitted needlefelt
filtration bag (top) 5 micron
collection bag (bottom) plastic
hose inlet diameter 100mm
number of inlets 1
workshop footrpint 420 x 650 x 1550mm
net weight 27kg
shipping weight 30kg

Sunday, November 7, 2010

Leg Joinery Complete


Here a a few snaps of the joinery in the legs of the Anniversary Shaker Table. The top joint is a simple mortise and tenon with slots for two wedges. The bottom joint has twin tenons to allow space for the sliding dovetail that holds the legs together. As a variation on the original design, I've opted to curve the uprights. This allows blending of the curves and makes it look a little more graceful.


The next step is to glue the joints, remove the excess timber, and start finishing. I'll admit there are a few gaps, so I'll be using an epoxy based glue for this operation.


Wedges and tennons were trimmed with a Lee Valley flush cut saw.